Homemade Bacon Brine Recipe - Everything You Need to Know
Bacon. There’s nothing better than a slab of fresh pork belly, grilled up for breakfast with a side of eggs. Well, there is something better - homemade bacon.
Making your own bacon is affordable, easy, and allows you to have total control over the brining and curing process.
I always cure my bacon at home since I like to have control over the flavors and ingredients that go into it. Some days I’ll go for the classic yet tasty; other days, I’ll smoke up some of my favorite maple bacon.
In this article, I’ll share with you my go-to brine recipe, as well as how I prepare, smoke, and store my bacon.
Quick Summary
- Homemade bacon brine involves a mix of cold water, white sugar, table salt, brown sugar, Prague powder, black peppercorns, and bay leaves.
- The brine is poured over pork pieces in ziplock bags and refrigerated for 7 days, flipped every 2 days.
- A 2022 study in the National Library of Medicine, found that increasing NaCl concentrations in bacon brine significantly reduces the formation of carcinogenic heterocyclic aromatic amines (HAAs) in fried bacon, while also affecting its moisture, color, and oxidative markers [1].
- Always remove the skin from pork before curing, cooking with the skin on will only give unpleasant results.
Where to Find Pork Belly

You can pick up bacon just about anywhere. However, that doesn’t mean it’s going to taste good.
Most store-bought bacon is made by large commercial producers looking to make a quick buck - quality being the last thing on their minds.
Homemade bacon is not only surprisingly easy, but it’ll also taste far better than anything you can find on a supermarket shelf.
Here are three places to pick up some amazing bacon:
1. Local Butcher/Farmer

The best place to find some pork belly is straight from your butchers.
More often than not, local sources of pork belly are of much higher quality since they will get it directly from the local farmer.
They’ll also contain no harmful bacteria and sodium nitrite.
If you have a higher budget, you can even go from Berkshire, Duroc, Mangalitsa, and Red Wattle pigs.
These are heritage-breed pork raised with high-quality care, feed, and love. This will show when it comes to texture and taste.
2. Ethnic Grocers

Since bacon made its way over to America through Asian dishes, it’s only natural to find some pork bellies stocked in your local ethnic grocers.
You will also be able to find them at a decent size - I recommend buying at least 5 pounds when making bacon.
3. Grocery Stores

If you haven’t managed to luck out in either of the above options, you can try searching a large grocery store.
Small stores will more than likely not sell pork belly due to the low demand. However, a large restaurant supply store will usually stock them.
It will work out cheaper by the pound, but they usually sell them by the case, which is around 50 pounds per case.
While this may not be a problem for some, others may see the large amount of pork belly as too much of an investment.
The Perfect Pork for Homemade Bacon

The best bacon will come with a 1:1 ratio of fat to muscle.
The fat on the pork belly should be a creamy white, and the muscle a light pink.
You may have heard of “streaky bacon” and “side bacon.”
These come from the tip of the ribs, with either 1:1 or 1:2 fat to muscle.
It usually depends on the pig - their age, breed, feed, etc.
The homemade bacon should be completely raw - no spices, brines, and definitely not previously cured.
Always source fresh, unfrozen pork belly. It should also be unsliced, as you will want to keep it intact for the curing.
Removing the Skin

The first thing to do before curing your pork is to remove the skin. I prefer to do it at home, but you can also ask your butcher to do it for you.
If you choose to do it this way, ask your butcher to save the skin so you can turn it into cracklin later on.
If you’re not sure whether the skin has been removed, you will be able to tell by the color.
The skin is usually a darker tan color, whereas the fat is a creamy white.
“It is a truth universally acknowledged that bacon can improve any situation”
- Jen Rasmussen, Author
If you don’t remove the skin, you will have problems when it comes to curing salt penetrating the fat. The skin is also very tough when fried, so you probably won’t enjoy the end result if you choose to leave it on.
Removing this skin can be a challenge, so follow the below instructions carefully:
- Place the pork belly on a large cutting board and take a sharp knife.
- Start at the corner of the pork belly and cut into the center of the meat.
- Take your second hand and use it to pull up the skin layer, placing your palm against the pork, so it doesn’t move.
- Carefully cut down the length of the pork until you have completely detached the skin.
You’ll want to place the skin inside the freezer until you are ready to make crackling with it.
Curing Brine
According to a Science Direct article different brining and curing conditions can affect homemade bacon's texture and flavor [2].
There are two ways to do a homemade bacon cure: the wet cure method and the dry cure method. I prefer to use a wet brine, but I will show you both methods so you can decide which works best for you.
Wet Cure
For the wet brine cure method, you will need:
- 6 cups of cold water
- 1 cup of white sugar
- 1 cup of table salt
- 1 cup of brown sugar
- 2 teaspoons of Prague powder
- 1 tablespoon of black peppercorn
- 2 bay leaves
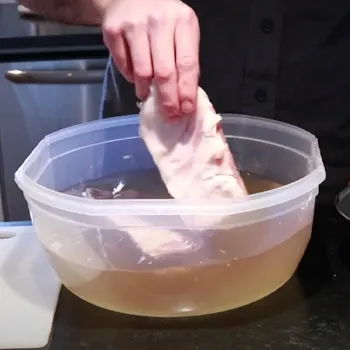
Mix all the ingredients together in a large bowl and place the pork pieces into ziplock bags.
Avoid putting more than one slab into the same wet brine bag. Pour the brine over the pork and move it around to ensure it’s evenly distributed.
To avoid any leakage, place the zip lock bag into a container.
You should place the pork belly into the refrigerator for 7 days, flipping it over every 2 days to ensure it cures equally on both sides.
After 7 days, the pork belly should be nice and firm.
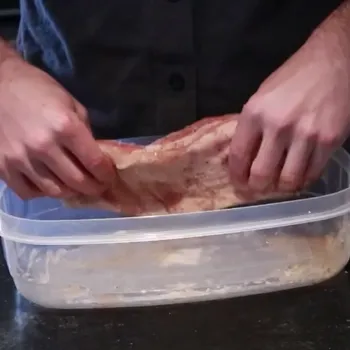
You can then take it out of the ziplock bag and rub it down with some black peppercorns, brown sugar, and maple syrup.
Dry Cure
For the dry cure method, you will need:
- ¼ cup kosher salt
- ¼ cup of dark brown sugar
- 1 teaspoon of Prague powder (pink salt)
- Black peppercorns
Mix all the ingredients into a bowl. You can grind the curing kosher salt either with a coffee grinder or a small blender to ensure it is small enough to distribute across the whole belly evenly.
Rub the dry curing salt rub down all sides of the belly and place it into a ziplock bag. Place the bag inside a container or dish with the fatty layer facing down.
Cover the whole thing with plastic wrap and ensure it’s tightly wrapped.
Place the cured meats into the refrigerator for 5 days. After a few days, you will notice a liquid beginning to form inside the ziplock bag.
Simply massage the liquid around the homemade bacon and place it back into the refrigerator.
After 10 days, the pork will become nice and fir. You can then remove it from the bag, rinse off the dry cure, and pat dry with paper towels.
The Smoking Process

When it comes to smoking homemade bacon, you can use the cold smoking method on a charcoal grill or gas barbeques.
If you’re lucky enough to have a pellet smoker at home, it will be easier to use that since you have better temperature control.
My homemade bacon can be either eaten plain or with pure maple syrup if you have a sweet tooth.
- Step 1 - (Charcoal Grill) - Open all the vents on your grill and remove the grill grate. Place a disposable foil pan or wire rack on the grate.
- Step 2 - (Gas Grill) - Disconnect the propane line and put the foil pan at the back corner of the grill grate under indirect heat. Don’t worry about the burners; you won’t be lighting them when smoking.
- Step 3 - Place five lit charcoal briquettes inside the chimney starter. Transfer the briquettes with tongs when they glow red and become covered with gray ash. Place them into wood chips (I recommend maple wood), spacing them evenly around the pan.
- Step 4 - When the wood chips begin to smolder, arrange thick slices of pork fat side down on the grill grate. There should be at least 1 inch between the bacon to allow the smoke flavor to circulate. Use a thermometer to measure the temperature of the grill. It should read 80 - 120 degrees F°. If the temperature is above 120 degrees F°, remove one of the charcoal briquettes.
- Step 5 - Stir the wood pellets every couple of hours to ensure all of the pellets are burning. You can also add more pellets once they begin to turn to ash.
- Step 6 - 3 hours into smoking, you should rotate the pork to ensure an even smoke. If your wood pellets stop burning at any point, you can add more briquettes. However, if it is not too wet or humid outside, you will probably have no need to do so.
- Step 7 - The entire cold smoke should take around 5 - 6 hours, or until the internal temperature reaches 160 degrees F°. Depending on the age and breed of the pork, it may turn a yellow-brown color. Pat the moisture off the smoked bacon with a paper towel. The homemade bacon will still be raw since this process was only for curing.
Cooking the Bacon

Once your bacon has been cured, you’re ready to fry. It is best to leave it in the refrigerator overnight.
If cooking thin belly, you should be able to fry 8 slices in a 12-inch skillet.
Fry over medium heat, frequently flipping until brown and crisp.
Once finished, leave the bacon on a paper towel and allow the grease to seep.
How To Store Bacon
You can store bacon in the refrigerator, either in slices or slabs. To store bacon slices, you should tightly wrap them in plastic wrap and ensure they are completely covered.
These bacon slices can last up to one week in the fridge or 2 months in the freezer.
If you freeze bacon slabs, you should let them defrost in the fridge before cooking or slicing.
It will be a lot easier to slice the bacon when soft.
Also Read: How Long Does Bacon Last in the Fridge?
Alternatives
If you prefer to add a little sweetness into your life, you can try this maple alternative:
- 1 cup of maple sugar instead of brown sugar
- 1 cup of maple syrup
- 2 tablespoons of vanilla extract
- Celery juice instead of curing salt (it can contain more sodium nitrite and make it less salty)
Use this brine with the same process above.
You can also follow a recipe with honey, ginger, soy sauce, garlic, and sriracha for an Asian twist.
Related Article: Pork Wellington Recipe
References:
- https://pubmed.ncbi.nlm.nih.gov/35546277/
- https://www.sciencedirect.com/topics/materials-science/cure-process